
ZenHR’s native integration with NetSuite allows seamless transfer of employee data, payroll, off-cycle payments, and financial transactions from ZenHR to NetSuite. This ensures that organizations can enjoy ZenHR’s user-friendly HRMS capabilities while keeping their accounting accurate and synchronized in NetSuite.
TABLE OF CONTENTS
-
How to Activate This Integration
1. On NetSuite2. On ZenHR
-
How to Use NetSuite Integration
1. Mapping NetSuite GL Identifiers With ZenHR Financial Transactions3. Syncing Organizational Levels
4. Posting Journal Entries
1. Set Up Journal Entries Structure
2. Posting salaries from ZenHR to NetSuite
3. Posting Off-Cycle Payments and Vacation In-Advance Salaries From ZenHR to NetSuite
4. Posting Provisions From ZenHR to NetSuite - NetSuite Event Viewer
How to Activate This Integration
On NetSuite
To activate NetSuite's built-in integration on ZenHR, the first step is to create a user token within NetSuite. This process begins by creating an integration app to generate the client ID and secret.
The user token is essential for establishing a secure connection between NetSuite and ZenHR, ensuring seamless data and functionality transfer between both systems.
Note: The user that will have the ZenHr Role must not be an admin on NetSuite
Step 1: Configure the integration on NetSuite
go to Setup → Company → Enable Features → SuiteCloud and tick the option “Token Based Authentication” (TBA) from the section “Manage Authentication.” as shown below
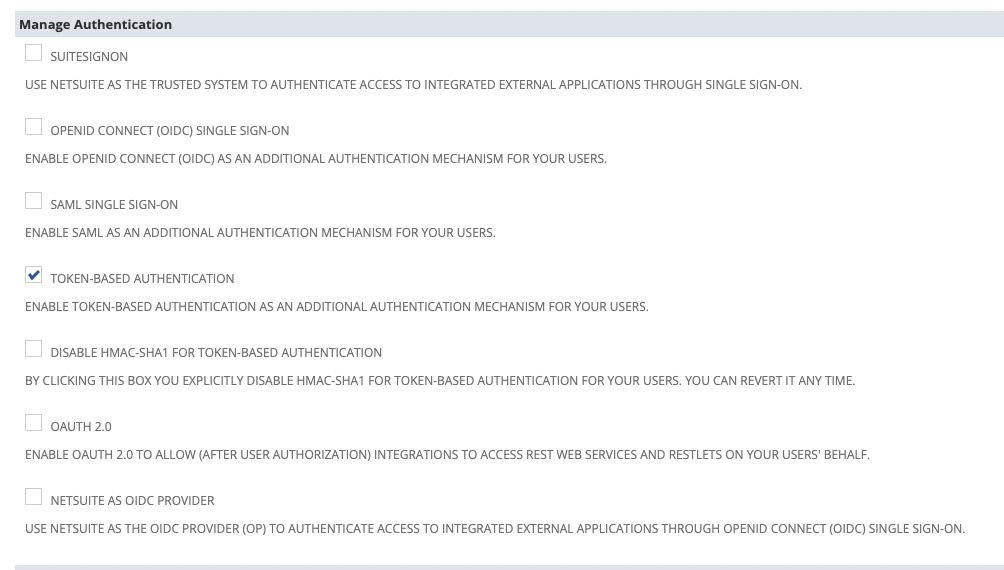
2. Go to Setup → Integrations → Manage Integrations → Click “New” to set up a new integration. as shown below.

3. Fill in the following fields:
Name: e.g.,
ZenHR_IntegrationState:
EnabledAuthentication: Tick Token-Based Authentication
Scope:
RESTLETS
4. Uncheck these options:
TBA: ISSUETOKEN ENDPOINTTBA: AUTHORIZATION FLOWAUTHORIZATION CODE GRANTUSER CREDENTIALS
5. Save the integration.
6. Consumer Key/Client ID and Consumer Secret /Client Secret will be generated for this integration, Make sure that you copy and save them as they only appear once.
Note : These credentials will be used in ZenHR to establish the connection.
7. Create a New Role, Go to Setup → Users/Roles → Manage Roles → New
8. Enter the Role Name, e.g.,ZenHR_Integratin_Role
9. Transactions Permissions --> Ensure the role has full permission to:
Make Journal Entries
10. Go to Lists -> Permissions -> Grant full permission for:
Accounts
Departments
Locations
Classes
Employee Records
Employees
11. Go to Setup -> Permissions Grant full permission for:
User Access Tokens
Access Token Management
Note : These permissions allow ZenHR to read and post financial transactions, employee data, and organizational levels securely.
12. Link the user that you will use for the integration with this role by going to Setup → Users/Roles → Manage Users then find the user and add the Role .
Note: the user should not have any other role on NetSuite (Only ZenHR Admin).
13. click on the user that you will use for the integration
14. Assign the newly created role ZenHR_Integration_Role to the user , Go to Access -> Roles -> Role
15. Generate a User Token , Go to Setup → Users/Roles → Access Tokens → New
16. Fill out :
Application Name:
ZenHR_IntegrationUser: The dedicated ZenHR user (non-admin)
Role:
ZenHR RoleClick save
17. Copy and Save the generated token details and keep them with you, as they will only be generated once.
18. Get the Authorization Realm , Go to Setup → Company → Company Information and copy the Account ID.
Step 2: Running The Scripts
NetSuite scripts are custom scripts written in SuiteScript, a JavaScript-based language used to extend NetSuite’s functionality. These scripts enable ZenHR to interact with NetSuite for syncing employees, GL accounts, organizational levels, and posting journal entries.
Note : These scripts are built for standard NetSuite environments.
Required Scripts
Choose the scripts based on whether your NetSuite account uses OneWorld or not. three essential scripts are required for this integration. You can download these scripts through the provided links: NetSuite Scripts
OneWorld (Multiple Subsidiaries)
Non-OneWorld (Single Subsidiary)
1. Upload the scripts from your computer, make sure that the script name ends with .js and select the folder SuiteApps.
2. Go to Customization → Scripting → Scripts → New → press on the “+” sign :
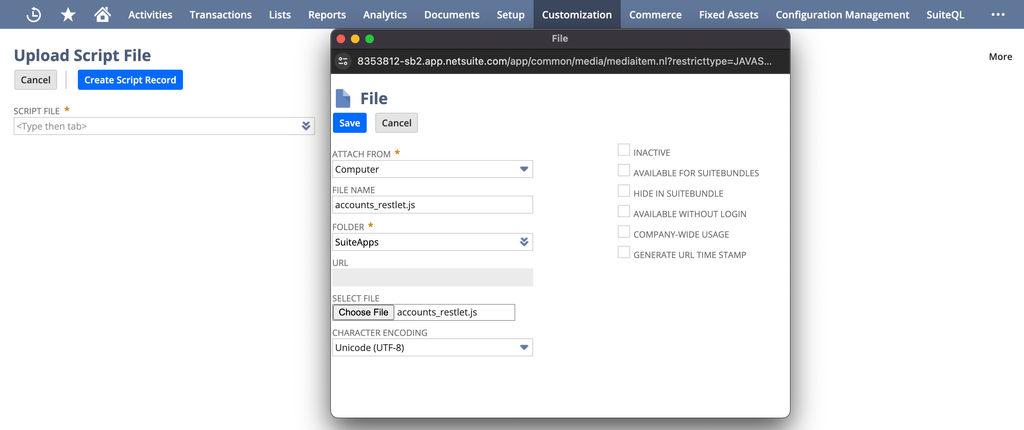
3. Go back to Customization → Scripting → Scripts → choose the script you just created by searching the file name → Press Create Script Record.
4. Enter the script name, and proceed to create a new entry in the deployments section with the following details: Status: Released and Log Level: Debug.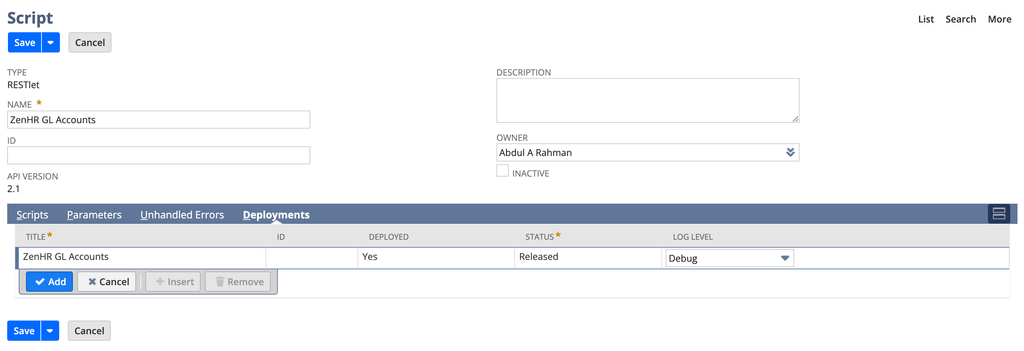
5. After saving the script details, it will be created, and you will be able to check the deployment details from the Deployments section.
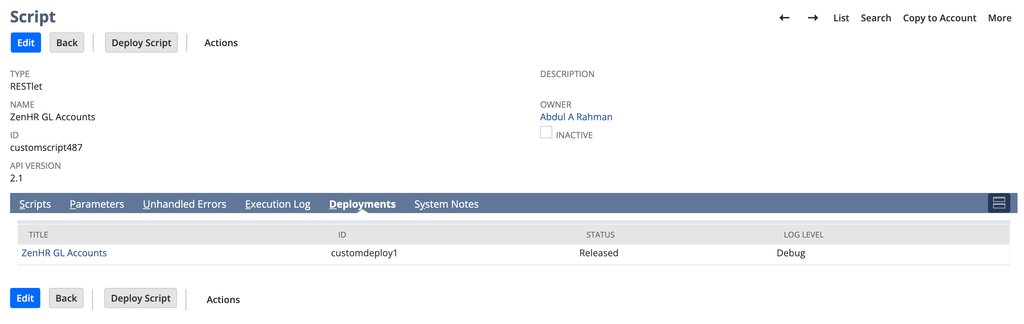
6. Click on the script deployment title to check and update the details if needed.
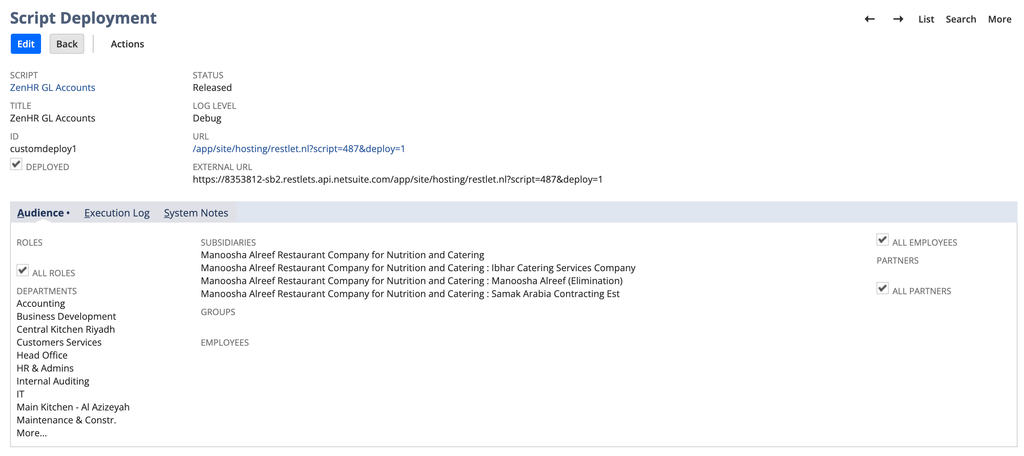
7. Ensure that the script has access to all roles, subsidiaries, employees, and groups by pressing on Edit then selecting all of them. The script is now prepared for utilization by ZenHR. You will simply need to copy the External URL for inclusion in the NetSuite integration setup on ZenHR.
8. To get the needed URLs from your NetSuite account:
Go to NetSuite → Customization → Scripts → Script Deployments
Click “View” in the needed script record.
Copy the External URL to add it to the ZenHR NetSuite integration setup.
Note: Do the same for all the Scripts to fetch the External URL of Employee URL, GL Account Identifiers URL, Journal entries URL
On ZenHR
Step 1: Configure the integration on ZenHR
- Go to System Preferences → Integration Setup → Marketplace Integrations → NetSuite Setup.
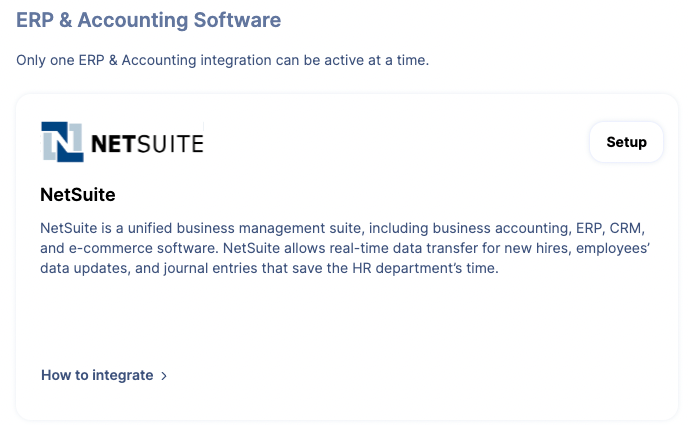
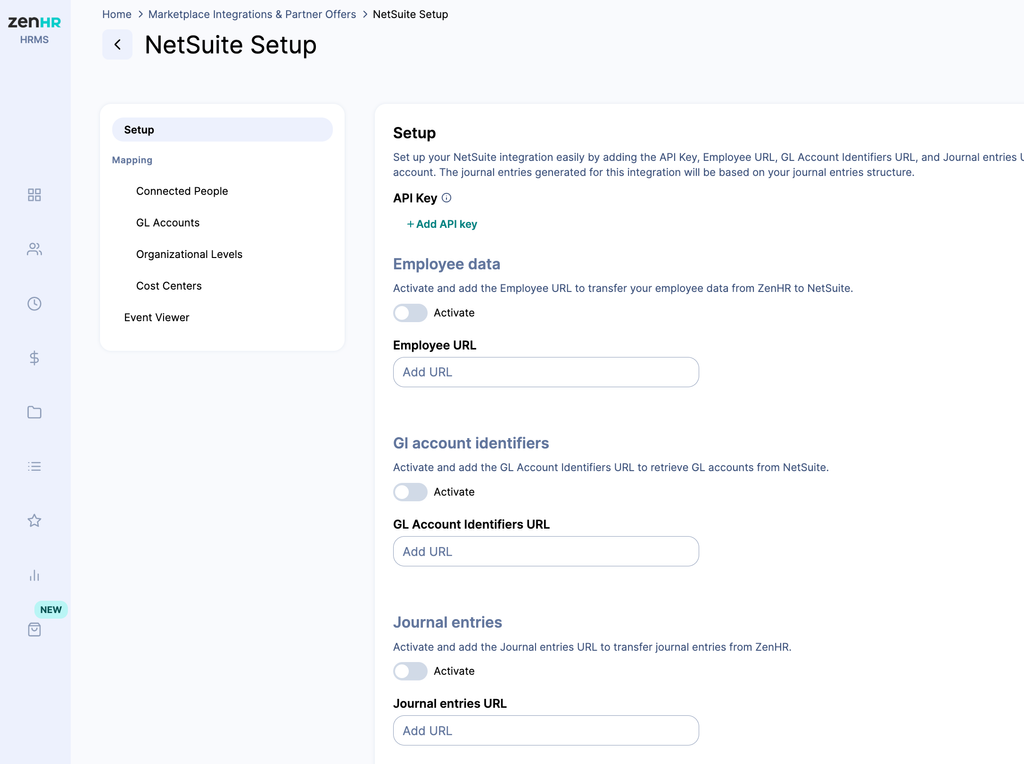
2. Add API KEY , Fill in the consumer key and consumer secret obtained from the Client ID , Secret ,Token Id and Token Secret generated from NetSuite, along with the Authentication Realm ( Account ID ) retrieved from the company information on NetSuite.
3. Activate the toggle in the Employee, GL Account Identifiers, and Journal Entry sections and add the External URL retrieved from your NetSuite account.
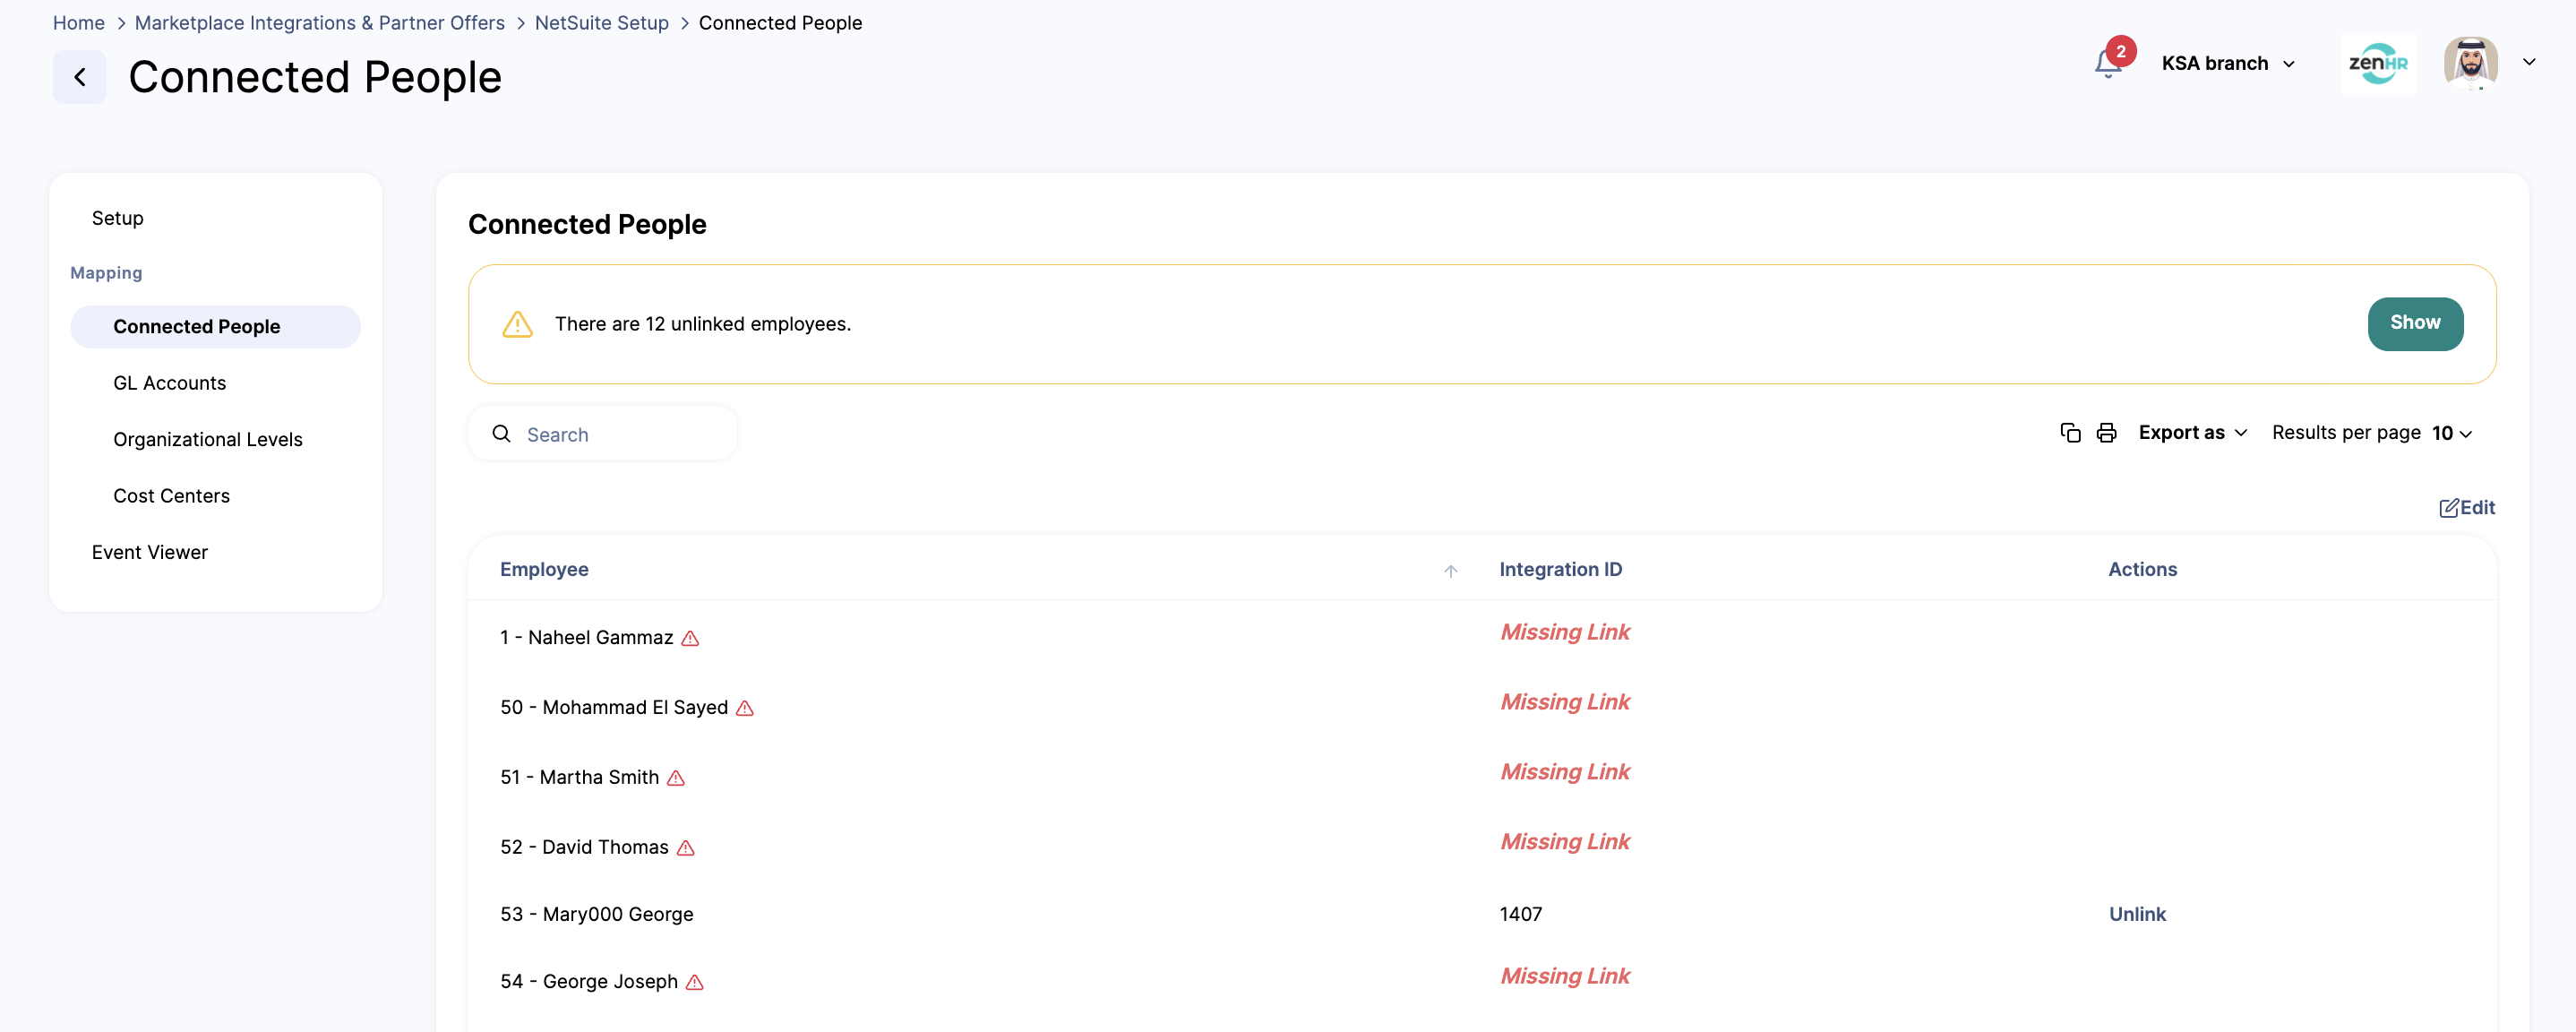
Important Note: Before enabling employee integration, ensure that each employee’s NetSuite Internal ID is accurately recorded in ZenHR under Marketplace Integration → NetSuite Setup → Connected People.
If the Internal ID is missing or incorrect, ZenHR will be unable to match the employee to their existing NetSuite record, resulting in the creation of a duplicate employee profile.
To prevent duplication, always verify that the correct NetSuite Internal ID is stored in ZenHR prior to enabling synchronization.
Adding NetSuite Subsidiary ID
To link your branch to the correct NetSuite account:
On NetSuite, go to Setup → Company → Subsidiaries list.
2. Find the Subsidiary ID, where you can find it in the page URL when you try to edit or view a subsidiary.

3. On ZenHR, go to System Preferences → General → Branch Setup.
4. Locate and modify the details of the specific branch you wish to link, and input the Financial integration Subsidiary ID which you can find in the URL same as the one shown above ( in our Ex the ID is 1 ).

The integration between ZenHR and NetSuite is currently active. To ensure accurate synchronization, verify that the branch name in ZenHR exactly matches the corresponding subsidiary name in NetSuite. Additionally, confirm that all organizational structures—such as work locations, departments, and other hierarchy levels—are consistently configured across both systems.
How to Use NetSuite Integration
Once NetSuite is successfully integrated with your ZenHR account, you will be able to:
Map GL accounts to ensure payroll and financial transactions align with your NetSuite chart of accounts.
Manage employee records by creating or updating them in ZenHR and syncing changes automatically to NetSuite.
Sync organizational levels by creating or updating them in ZenHR and syncing changes automatically to NetSuite.
-
Transfer journal entries for:
Salaries
Off-cycle financial transactions
Employee settlements
Company contributions
Expenses
Provisions
This ensures accurate and consistent financial data, employee information, and organizational structures across both ZenHR and NetSuite.
Mapping NetSuite GL Identifiers With ZenHR Financial Transactions
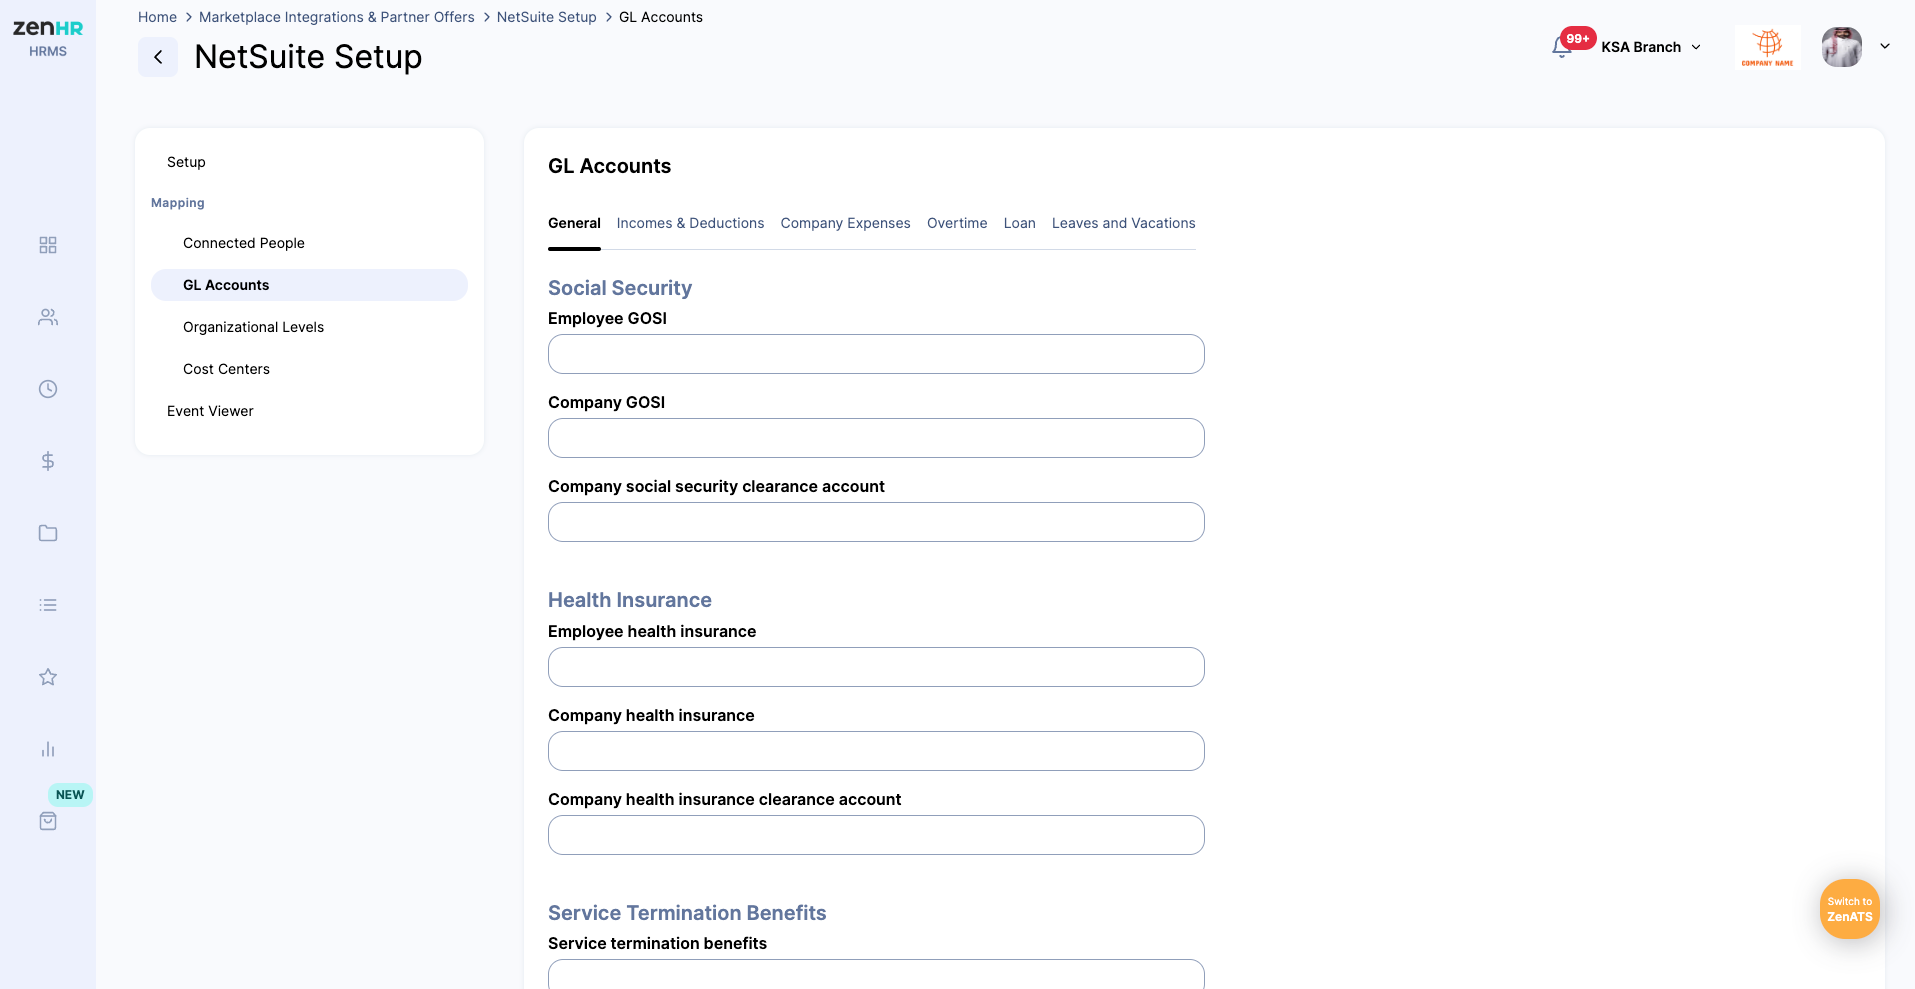
Once the integration with NetSuite is enabled, the chart of accounts will be accessed through the APIs. Consequently, the GL account will be displayed in the GL Accounts fields across all financial transaction types in the same page.
Add and Map GL Accounts
On ZenHR, click your user icon in the upper right corner and go to System Preferences → Marketplace Integrations → NetSuite Setup → GL Accounts.
Select the correct GL account for each salary transaction type from the dropdown list which will show the GL Accounts in your NetSuite Account.
Then click “Update”.
Add Financial Transactions GL Accounts
Navigate to Incomes & Deduction Tab in the same page above
Access the Financial Transaction Type by selecting “✎” icon on the Transaction Type entry.
Choose the GL Account Number and Clearance account Or Enter them Manually.
Finally, press Save
Add Loans GL Accounts
Navigate to Loans Tab in the same page above
Access the specific Loan Type by selecting “✎” icon on the corresponding record.
Choose the GL Identifier and the Clearance account.
Finally, press Save
Add Overtime GL Accounts
Access the Overtime Type by selecting “✎” icon on the corresponding record.
Choose the GL Identifier and Clearance account.
Finally, press Save
Add Leaves and Vacations GL account
Access the Leaves and Vacations Type by selecting “✎” icon on the corresponding record.
Select the GL Identifier and Clearance Account.
-
Finally, press Save
Syncing Employee Records
Once the integration is activated, employee records will automatically be created or updated in NetSuite whenever employee data is created or modified in ZenHR.
There are two supported scenarios:
Updating Existing Employees
If the employee already exists in both ZenHR and NetSuite, you must enter the employee’s NetSuite Internal ID in ZenHR under:
Marketplace Integration → NetSuite Setup → Connected People.
This ensures that any updates made in ZenHR are correctly reflected in the corresponding NetSuite record.Creating New Employees
To create a new employee, simply add the employee record in ZenHR.
The employee will be automatically created in NetSuite, and the Internal ID generated by NetSuite will be stored in ZenHR to enable future synchronization.
Syncing Organizational Levels
The Org Levels that can be Updated or created:
- Department
- Work Location
- Section (Which is a Child of the Department)
- Class, Which is referred to Project in ZenHr
Scenarios
-
Updating Existing Org levels
If an organizational level already exists in both ZenHR and NetSuite:
1. Navigate to Marketplace Integration → NetSuite Setup → Org Levels in ZenHR.
2. Add the Internal ID of the corresponding organizational level in NetSuite.
3. Once linked, any updates made to the name of the organizational level in ZenHR will automatically sync with NetSuite , as shown below.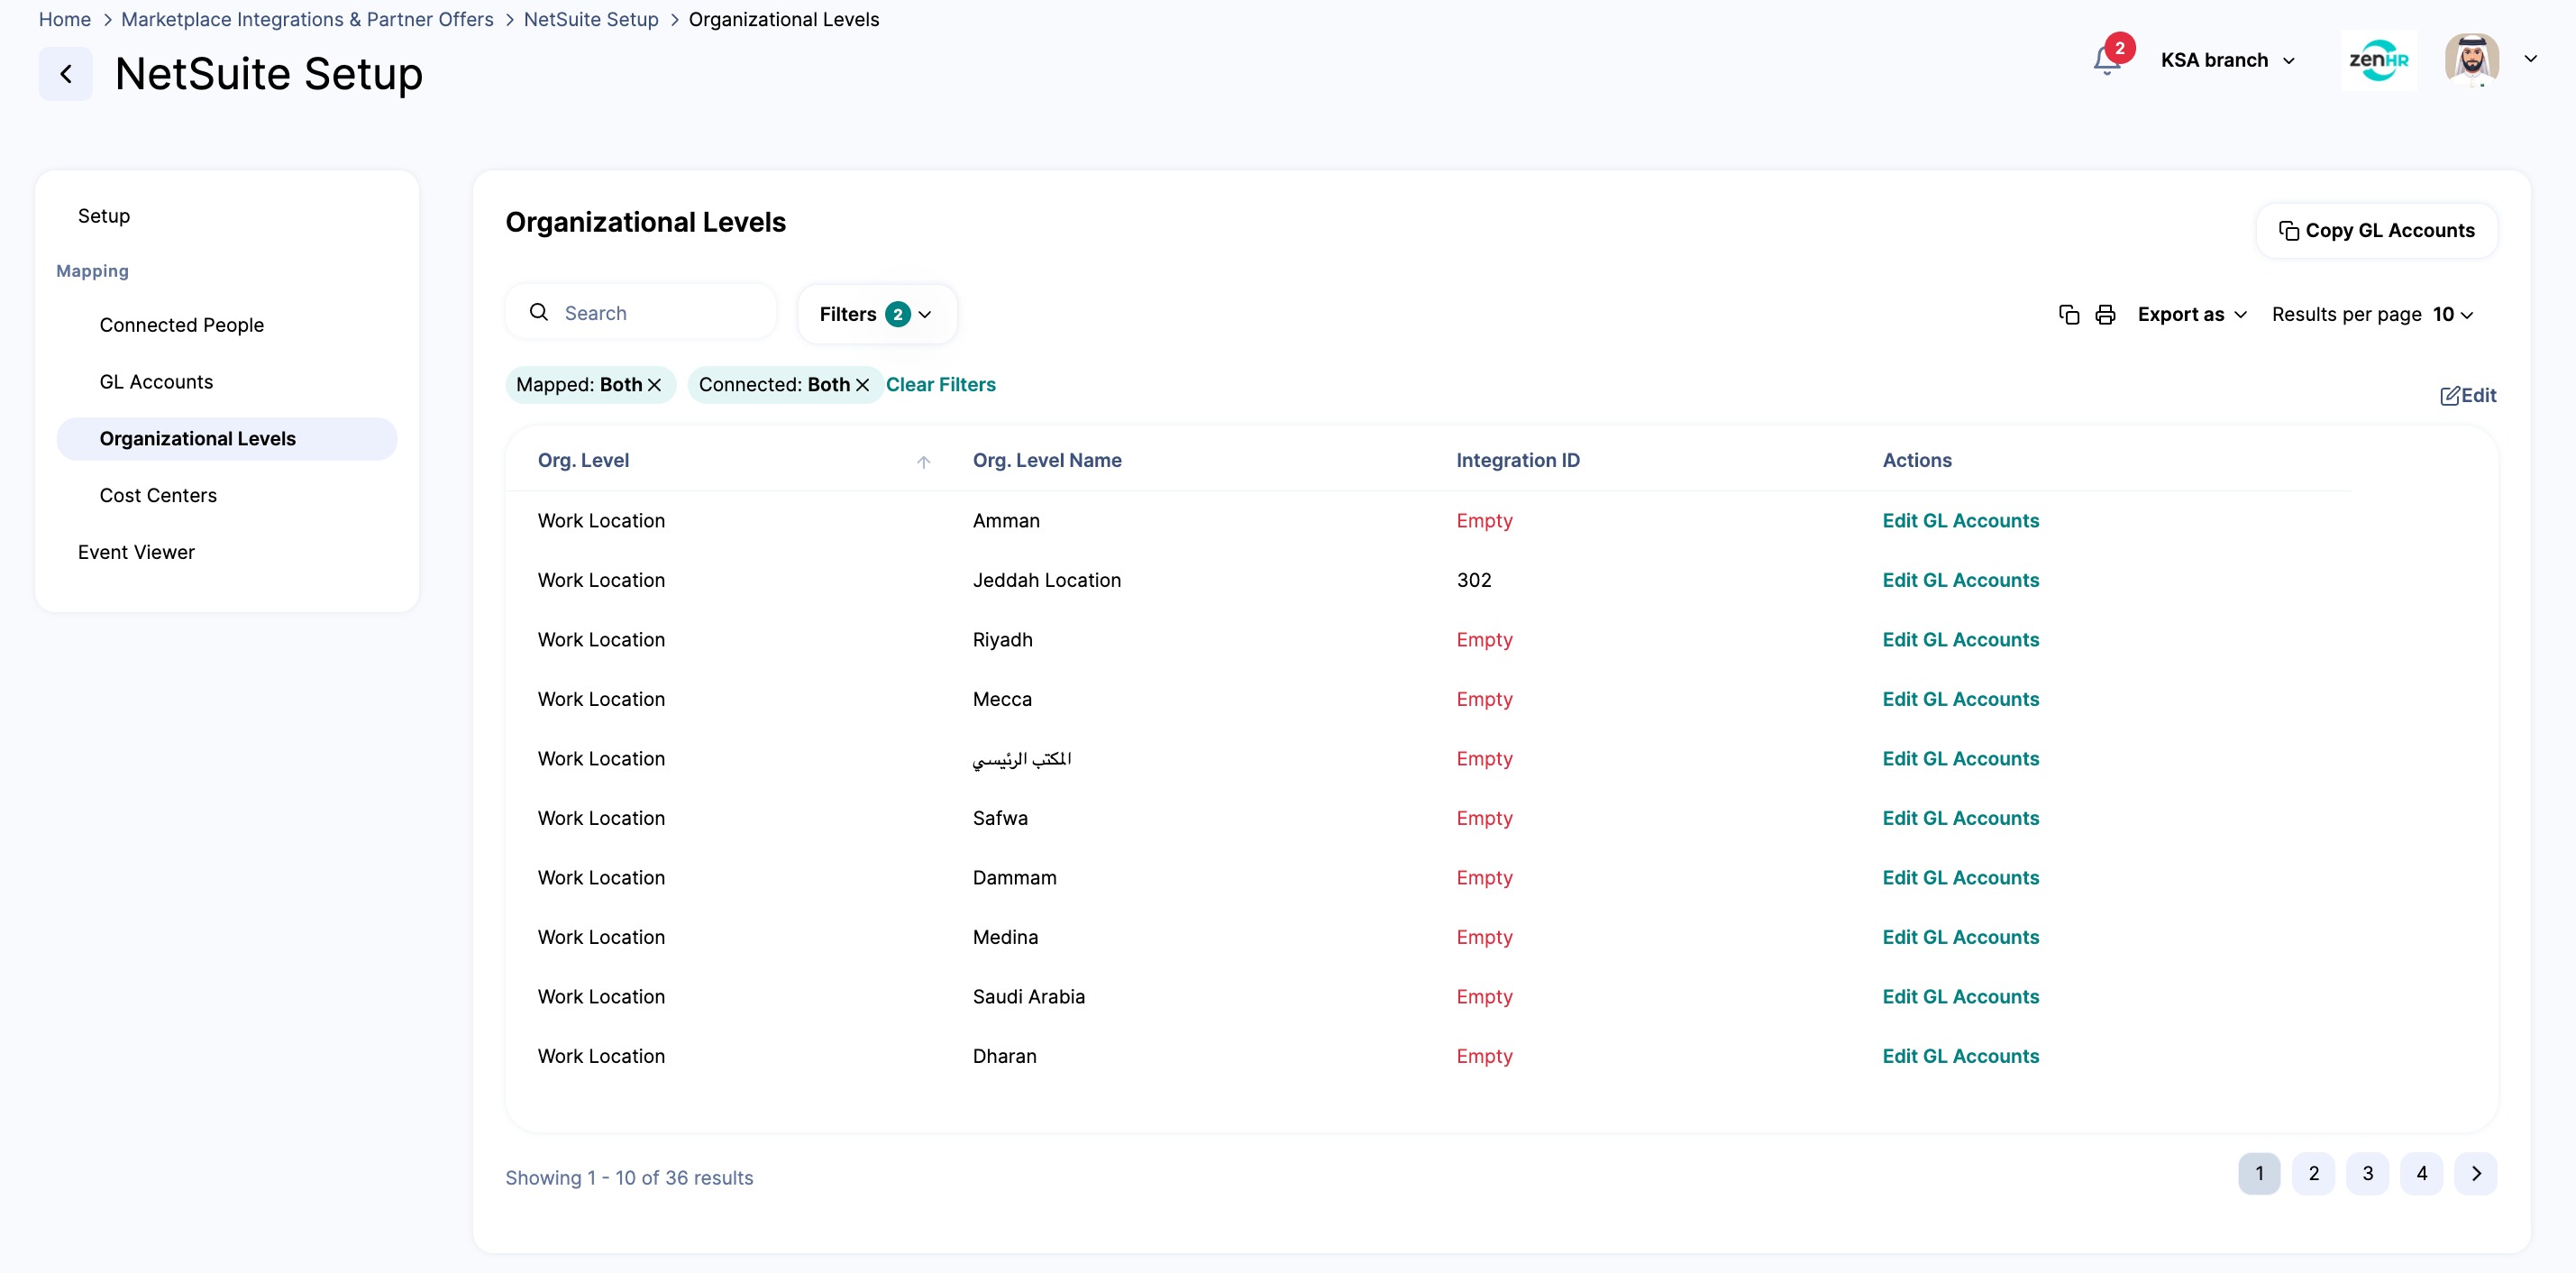
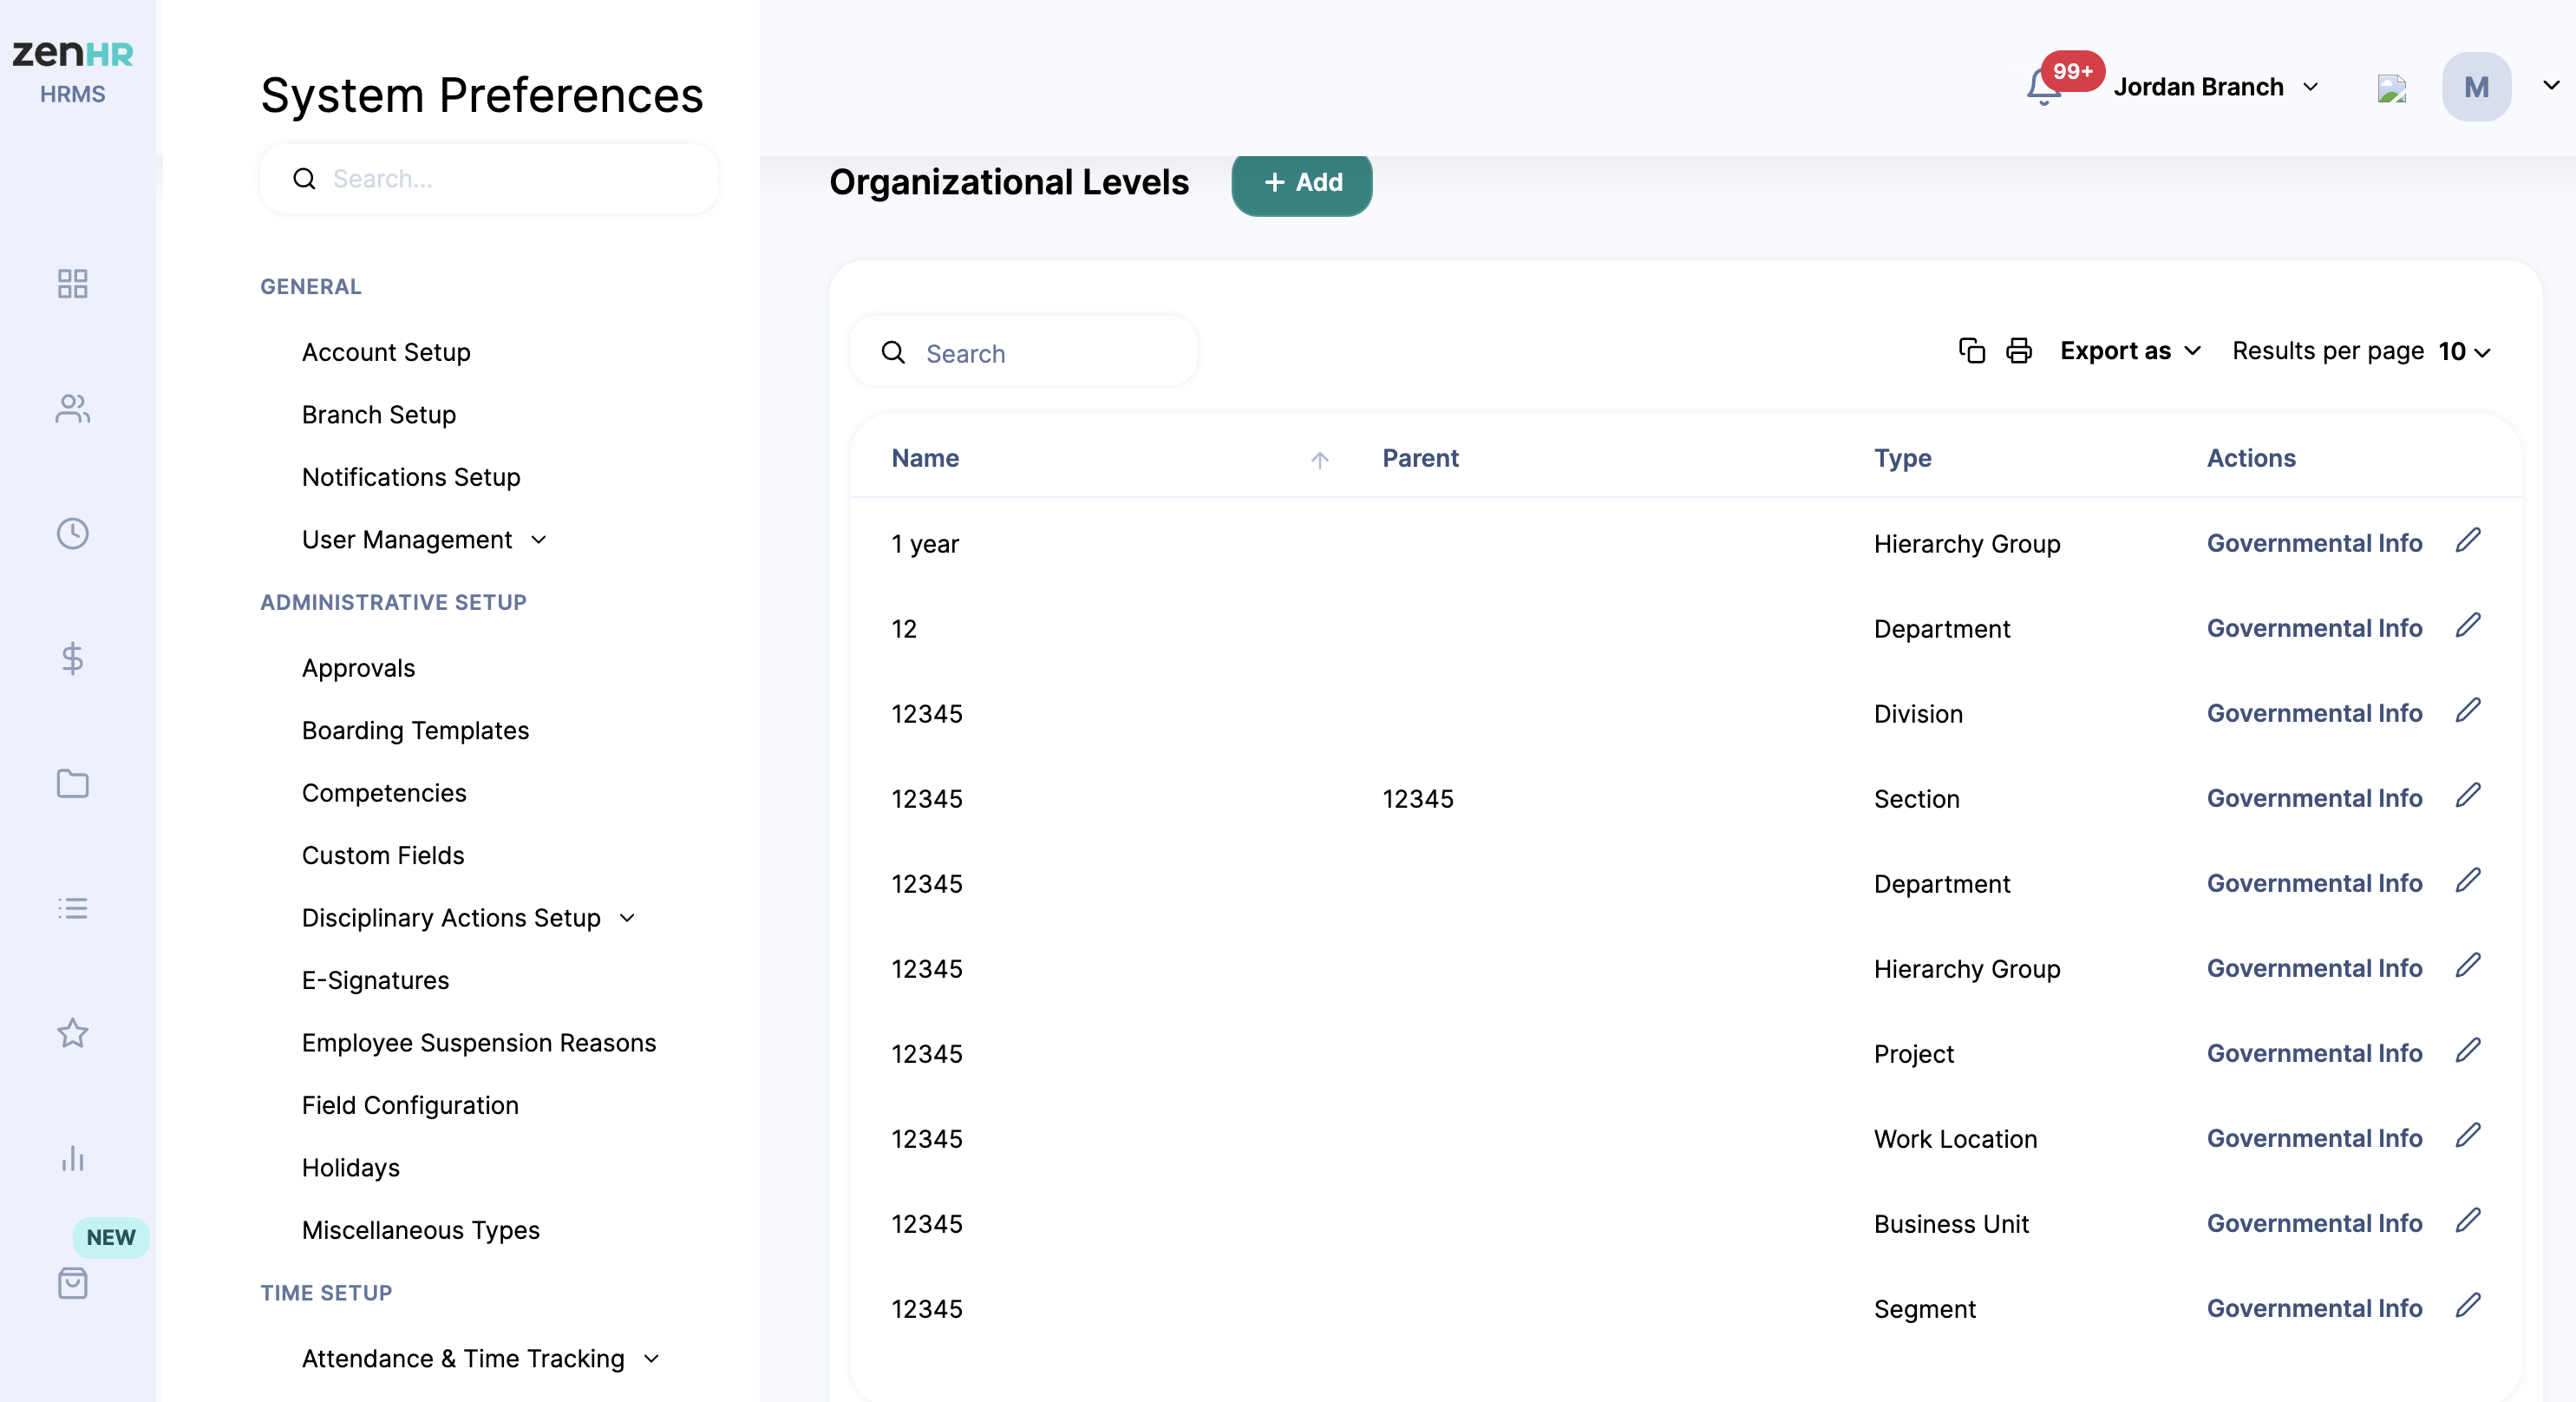
- Creating New Org Levels:
- Navigate to System Preferences → Organizational Levels in ZenHR.
- Create the new organizational level directly in ZenHR.
- Once created, the organizational level is automatically pushed to NetSuite.
- The corresponding Internal ID is stored in ZenHR for future reference and updates.
Posting Journal Entries
Upon activating the integration, you will be able to transfer journal entries for salaries, off-cycle financial transactions, employee settlements, company contributions, expenses, and provisions from ZenHR to your NetSuite account.
Set Up Journal Entries Structure
Before initiating the transmission of journal entries from ZenHR to NetSuite, it is essential to configure Journal Entries Structure. This setup enables you to specify the types of journal entries for transfer, whether they are detailed on an employee level or summarized by a specific cost center, and if they should be dispatched automatically or manually.
Steps to Configure Journal Entries Structure
- Navigate to System Preferences → Integration Setup → Journal Entries Structure.
- Select the journal entry types to transfer
- Set up the way you would like your journal entries structured by completing the following fields, then click “Save”..
Posting salaries from ZenHR to NetSuite
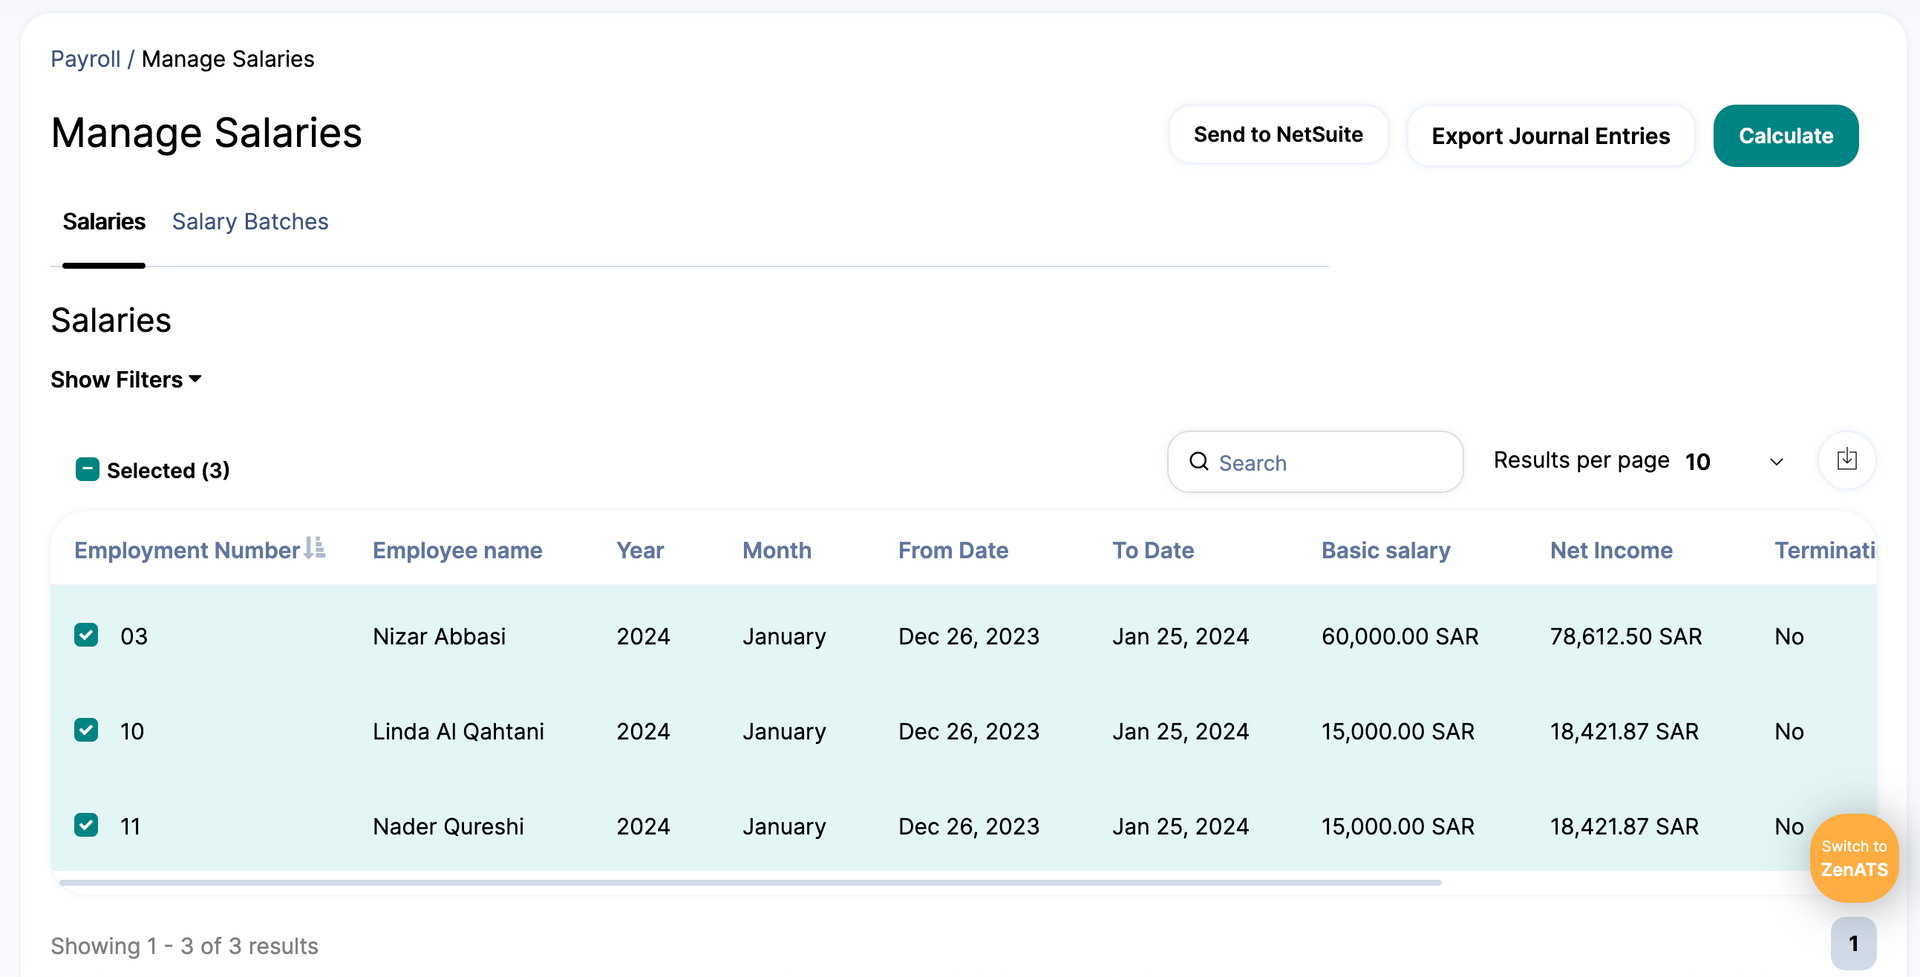
On the left side of the page, go to Main Menu → Payroll → Manage Salaries.
Filter the desired Salary Year and Month for all employees, and click “Filter”.
Then click “Send to NetSuite”, and your salaries will be transferred as journals.
Posting Off-Cycle Payments and Vacation In-Advance Salaries From ZenHR to NetSuite
Auto-Generate separate journals for Off-Cycle payments and post them with your Payroll Journal Entries- Click your user icon in the upper right corner and go to System Preferences → Journal Entries Structure.
Activate the Auto-generate separate journals for off-cycle checkboxes Below and click “Save”.
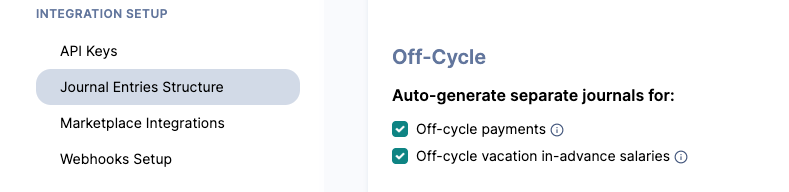
Note : Now whenever You post salaries from ZenHR to NetSuite, and Off-Cycle Payments and Vacation In-Advance Salaries will be sent as separate journals.
Manually Generate Off-Cycle Payments journal entries
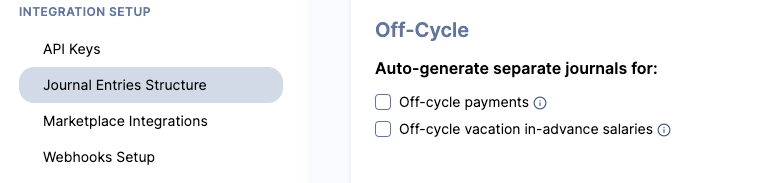
Click your user icon in the upper right corner and go to System Preferences → Integration Setup → Journal Entries Structure.
-
Clear the Auto-generate separate journals for off-cycle payments checkbox and click “Save”.
To Send Off-Cycle Payments to NetSuite
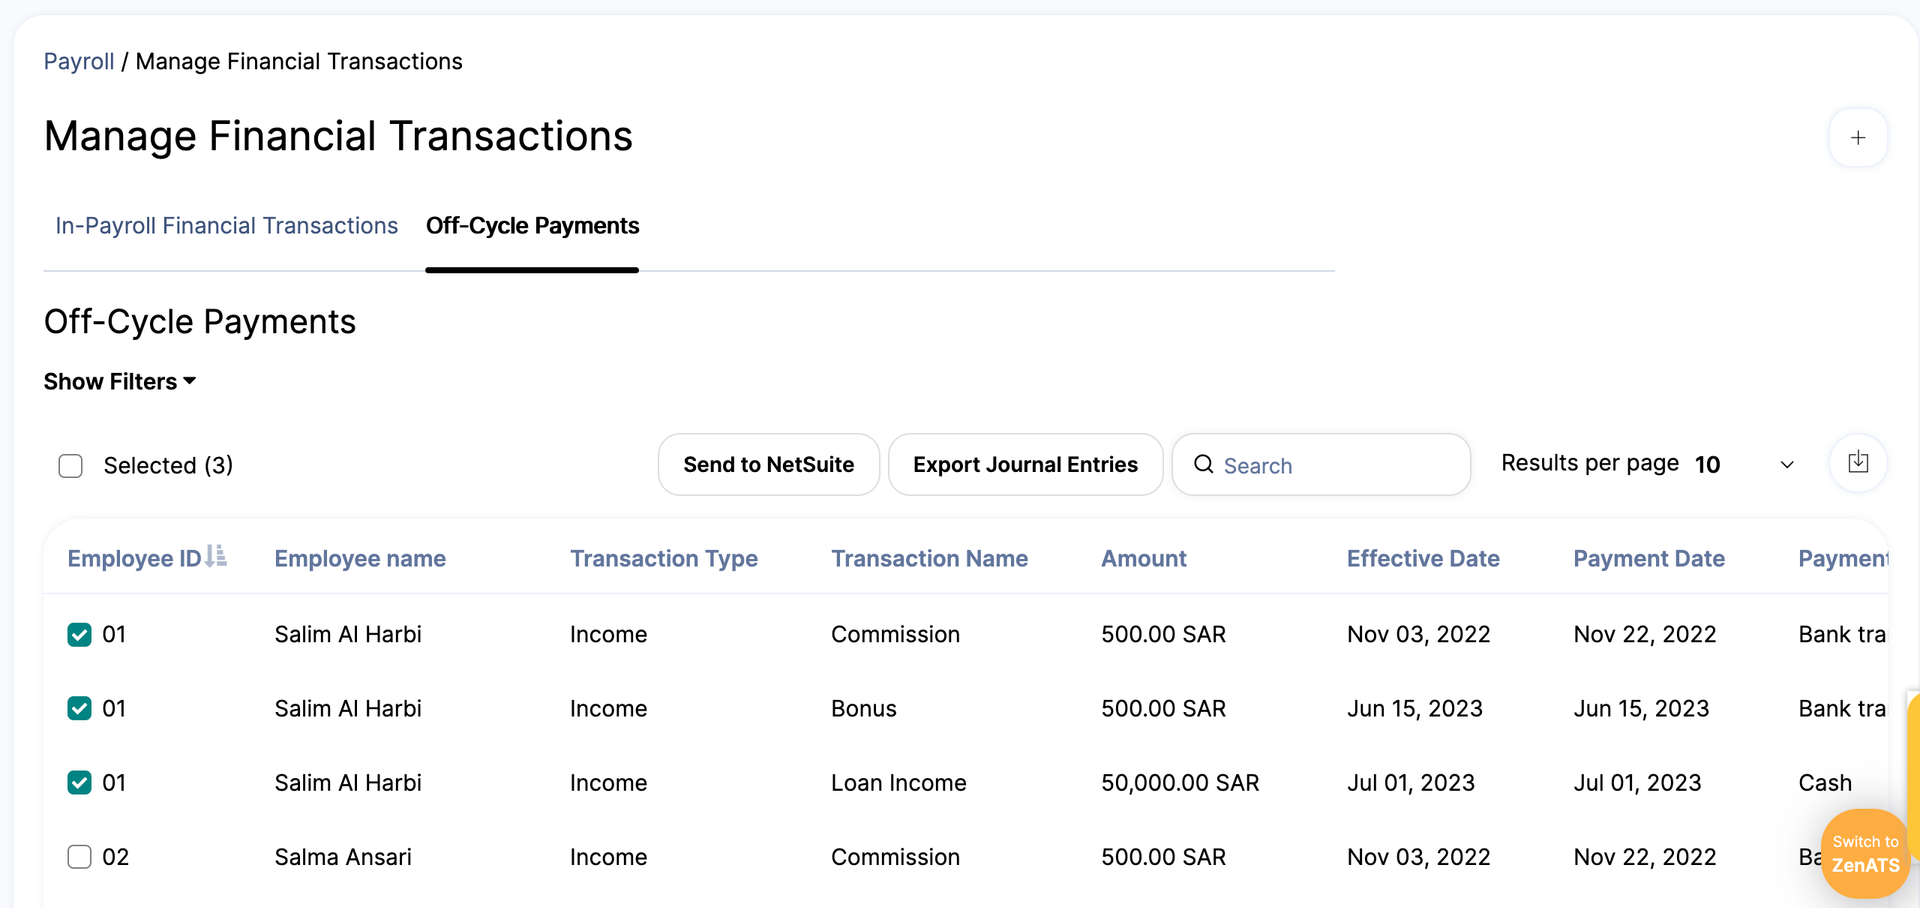
Go to Main Menu → Payroll → Manage Financials → Manage Financial Transactions → Off-Cycle Payments
Use the “Date from” and “to” filters to filter out the duration of the transactions you wish to include in your journal entries, and click “Filter”.
In the Employee ID column, select the transactions you wish to include in your journal entries.
Then click “Send to NetSuite”, and your off-cycle payments will be transferred as journals.
Manually Generate Off-Cycle Vacation In-Advance journal entries
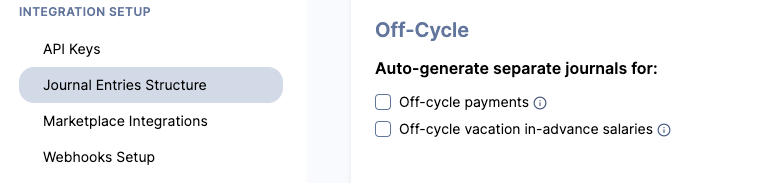
Click your user icon in the upper right corner and go to System Preferences → Integration Setup → Journal Entries Structure.
Clear the Auto-generate separate journals for off-cycle vacation in-advance checkbox.
Then click “Save”.
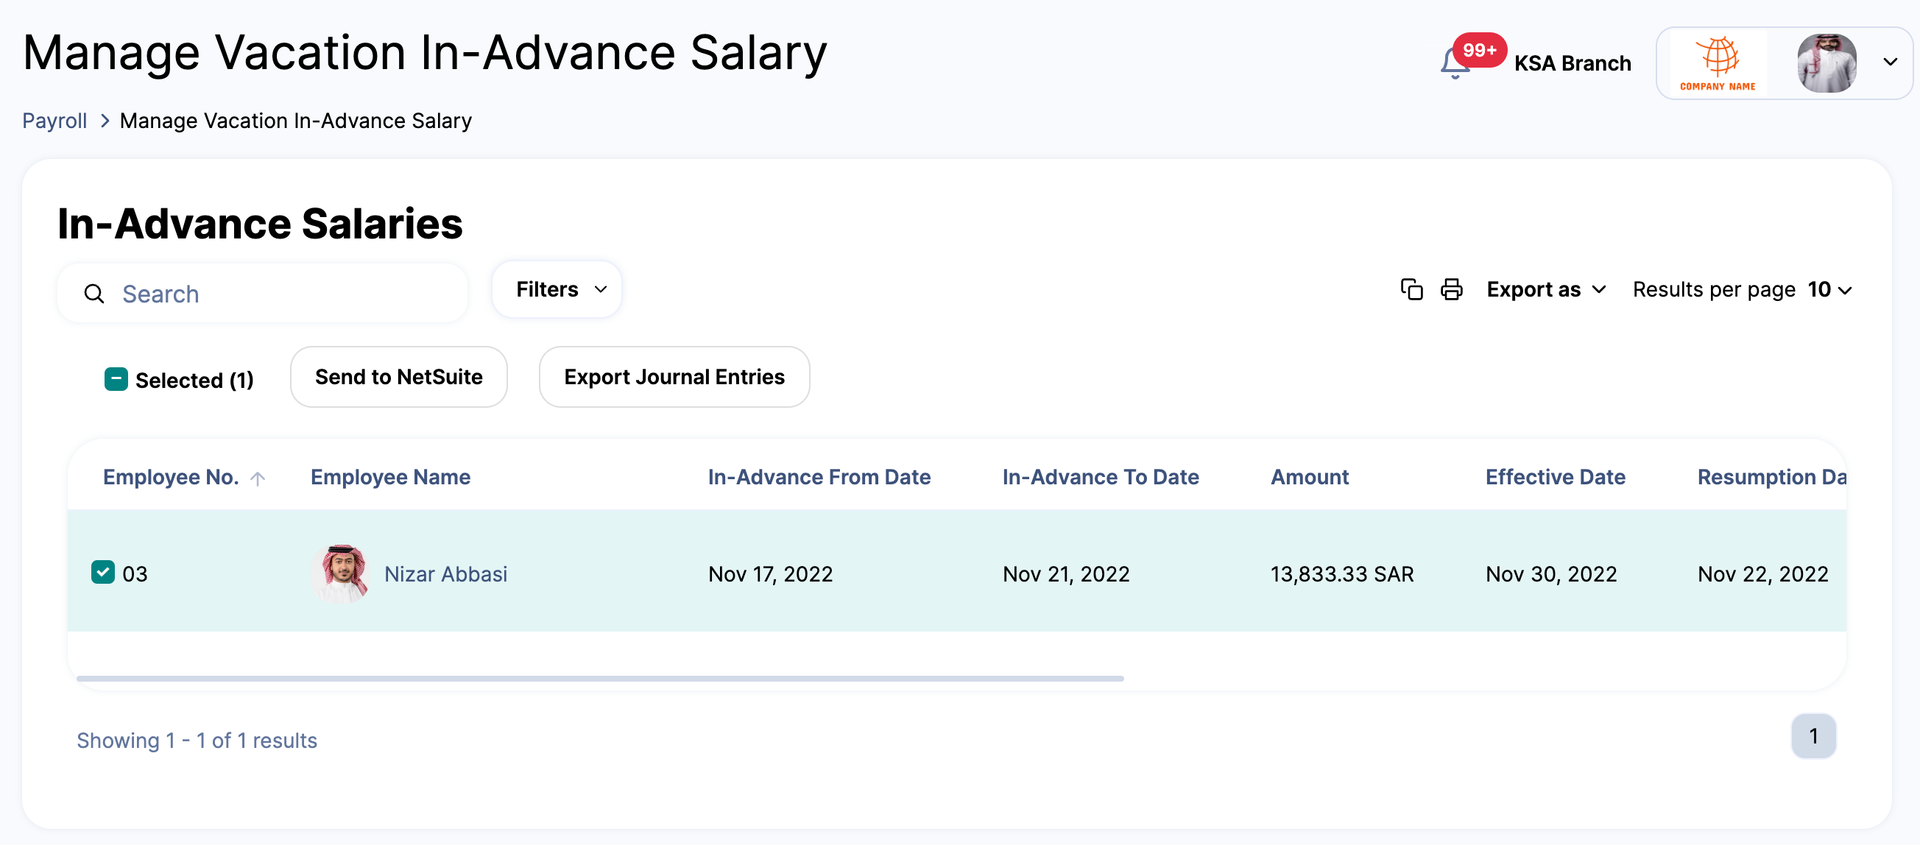
Go to Main Menu → Payroll → Manage Financials → Manage Vacation In-Advance Salary.
Filter out the vacation in-advance salaries that fall within a specific time period by using the “In-advance from date” and “In-advance to date” filters.
Select “Off-cycle” under Payroll status and click “Apply Filters”.
Then, under the Employee No. column, select the in-advance salaries you wish to include in your exported journal entries. Or you can select all the filtered salaries by clicking the “Select all” checkbox.
Then click “Send to NetSuite”, and your off-cycle vacation in-advance salaries will be transferred as journals.
-
Posting Provisions From ZenHR to NetSuite
Auto-generate Provision Journals
Click your user icon in the upper right corner and go to System Preferences → Integration Setup → Journal Entries Structure
Activate the Calculate employees' provisions toggle.
Activate the Auto-generate journal entries for employees' provisions toggle.
Then select the desired option under “How to generate provision journal entries”.
click “Save”.
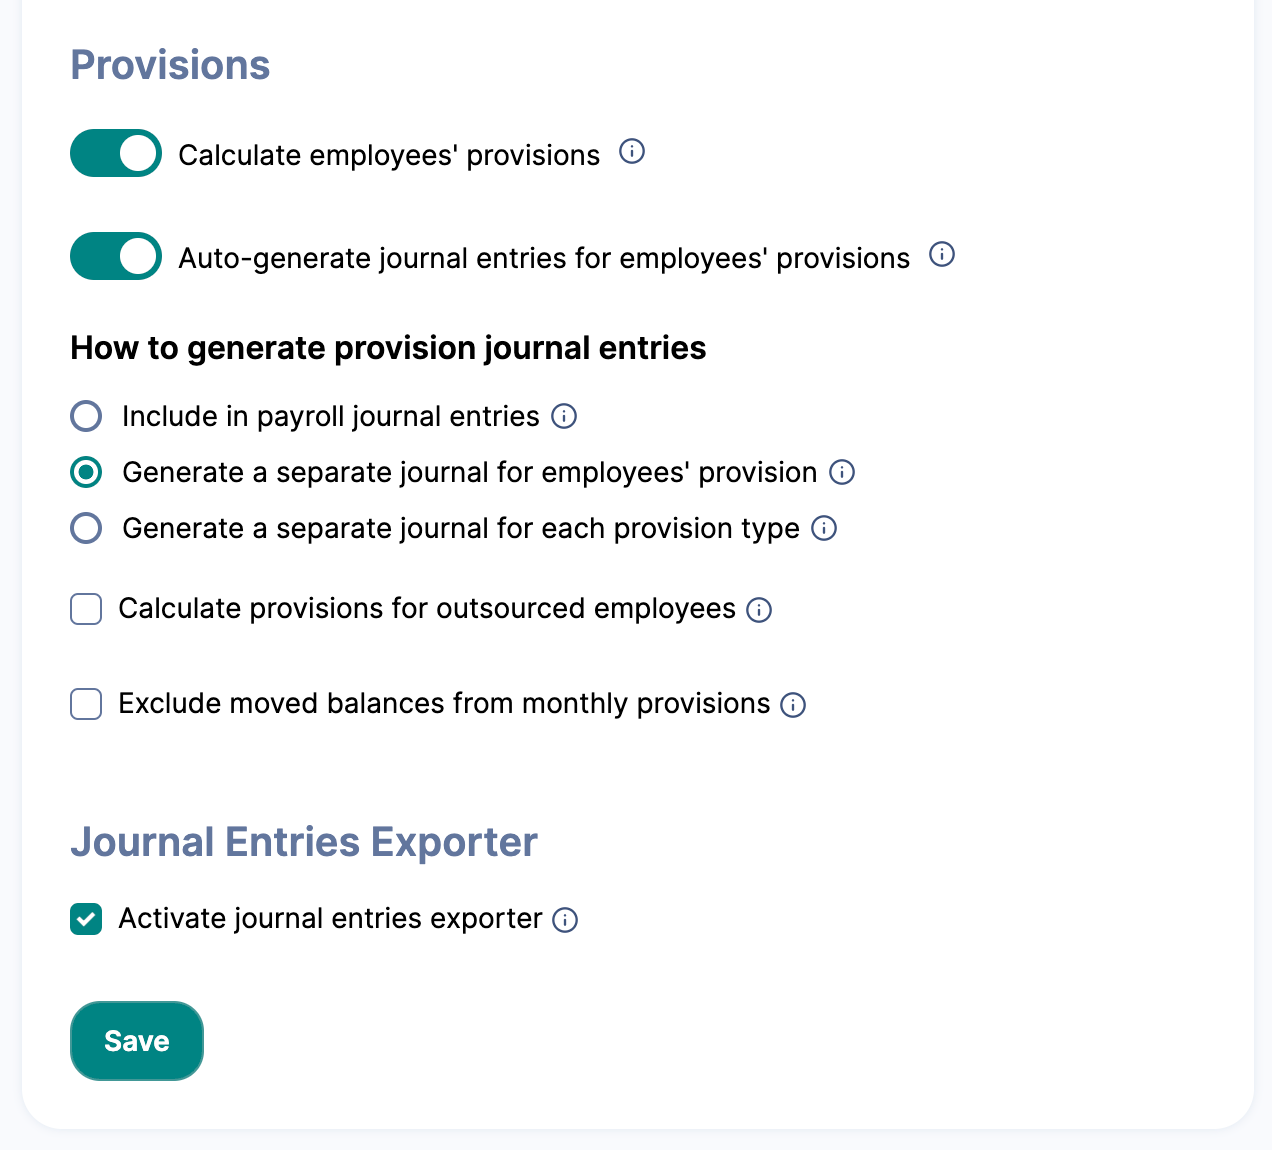
Note : This way when You post salaries from ZenHR to NetSuite, A Separate Provision Journal will get sent also
.Manually Generate Provision Journals
Click your user icon in the upper right corner and go to System Preferences → Integration Setup → Journal Entries Structure.
Activate the Calculate employees' provisions toggle.
Deactivate the Auto-generate journal entries for employees' provisions toggle.
Then select the desired option under select “How to generate provision journal entries”.
Click “Save”.
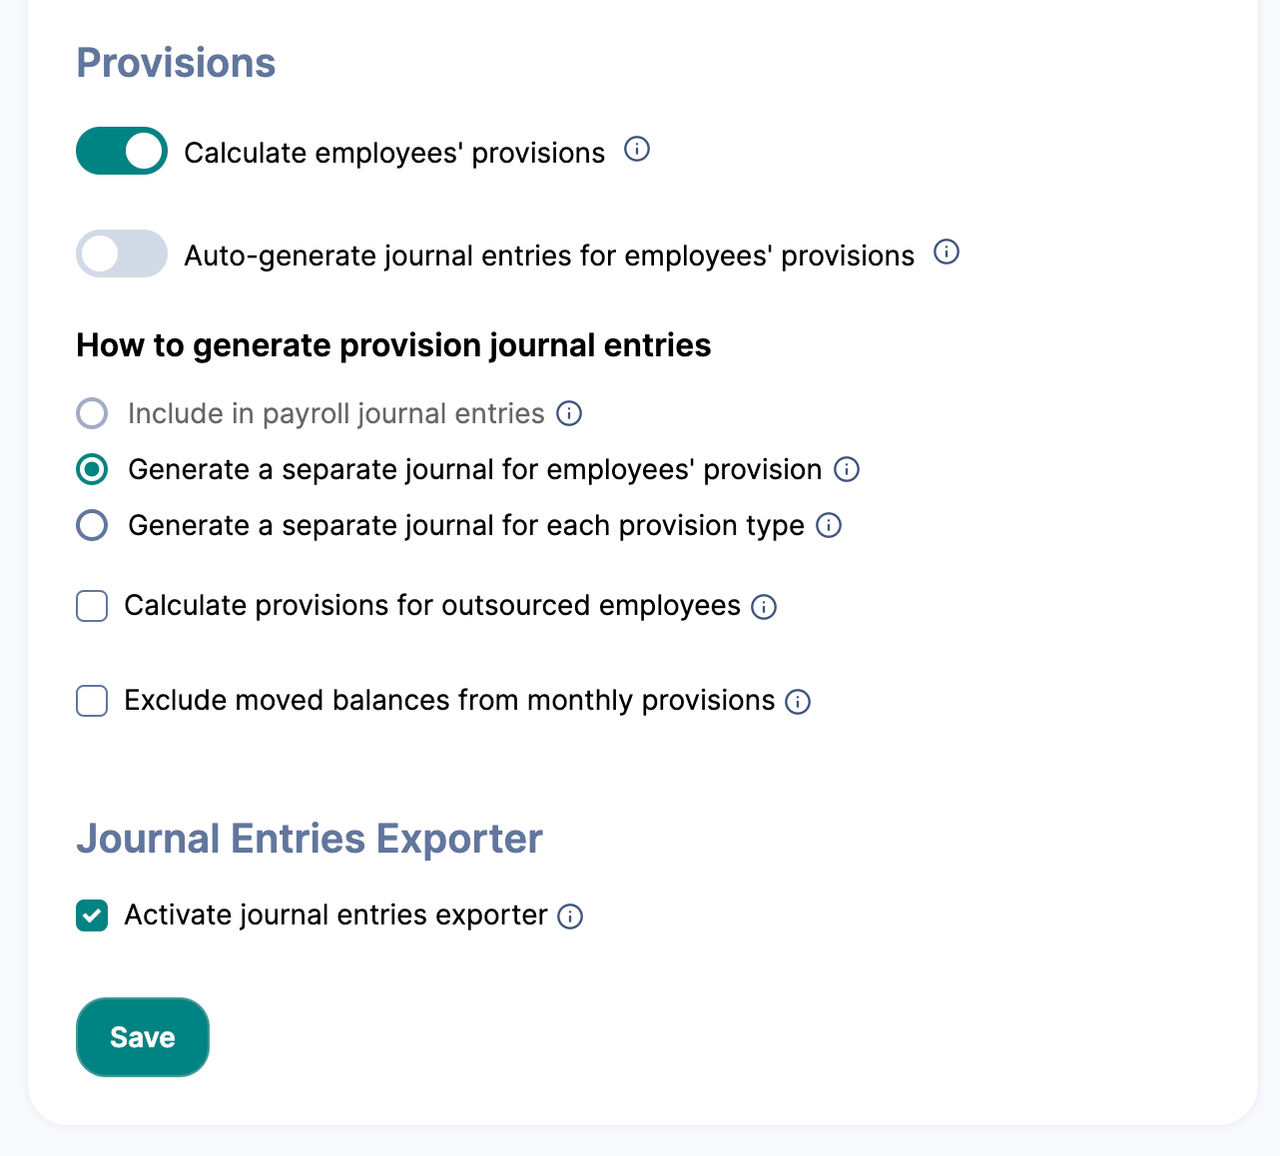
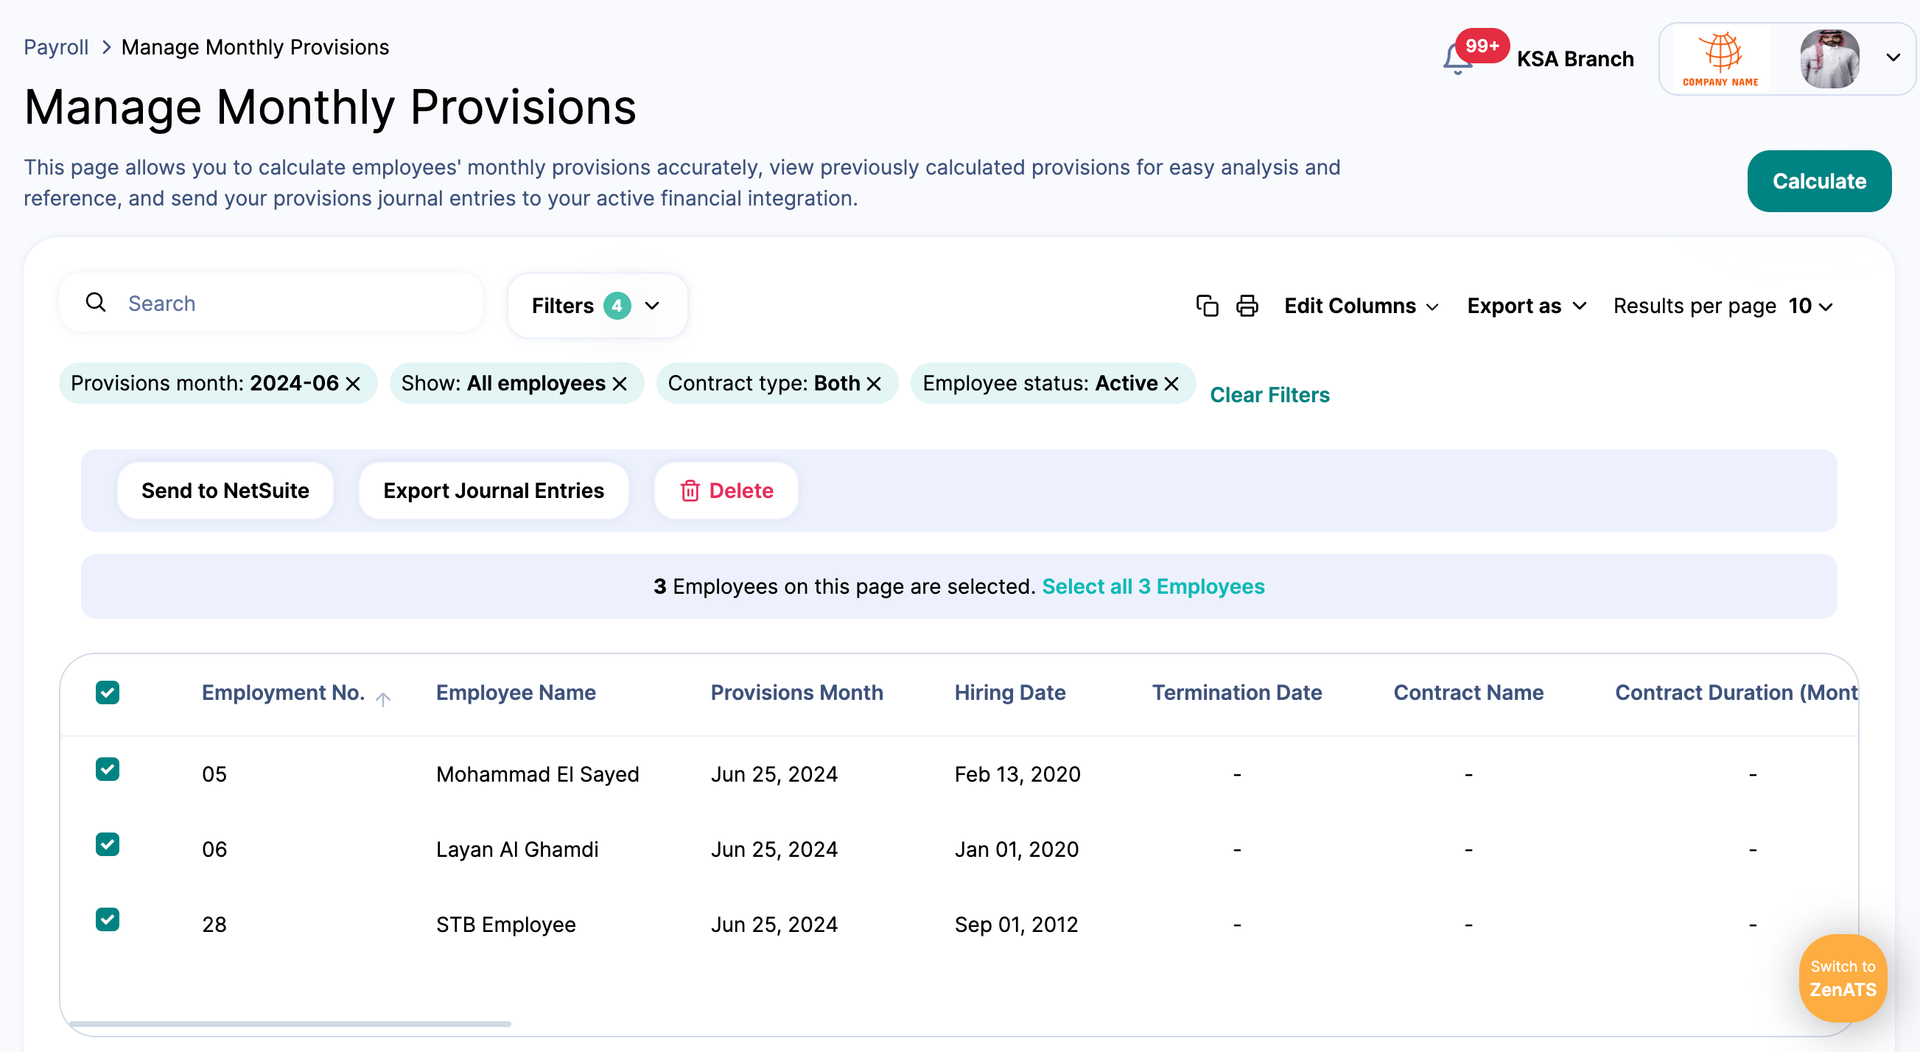
Then on the left side of the page, go to Main Menu → Payroll → Manage Monthly Provision.
Enter the desired salary Year and Month for all employees, and click “Filter”.
Then click the“Send to NetSuite” and your provisions will be transferred as journals.
NetSuite Event Viewer
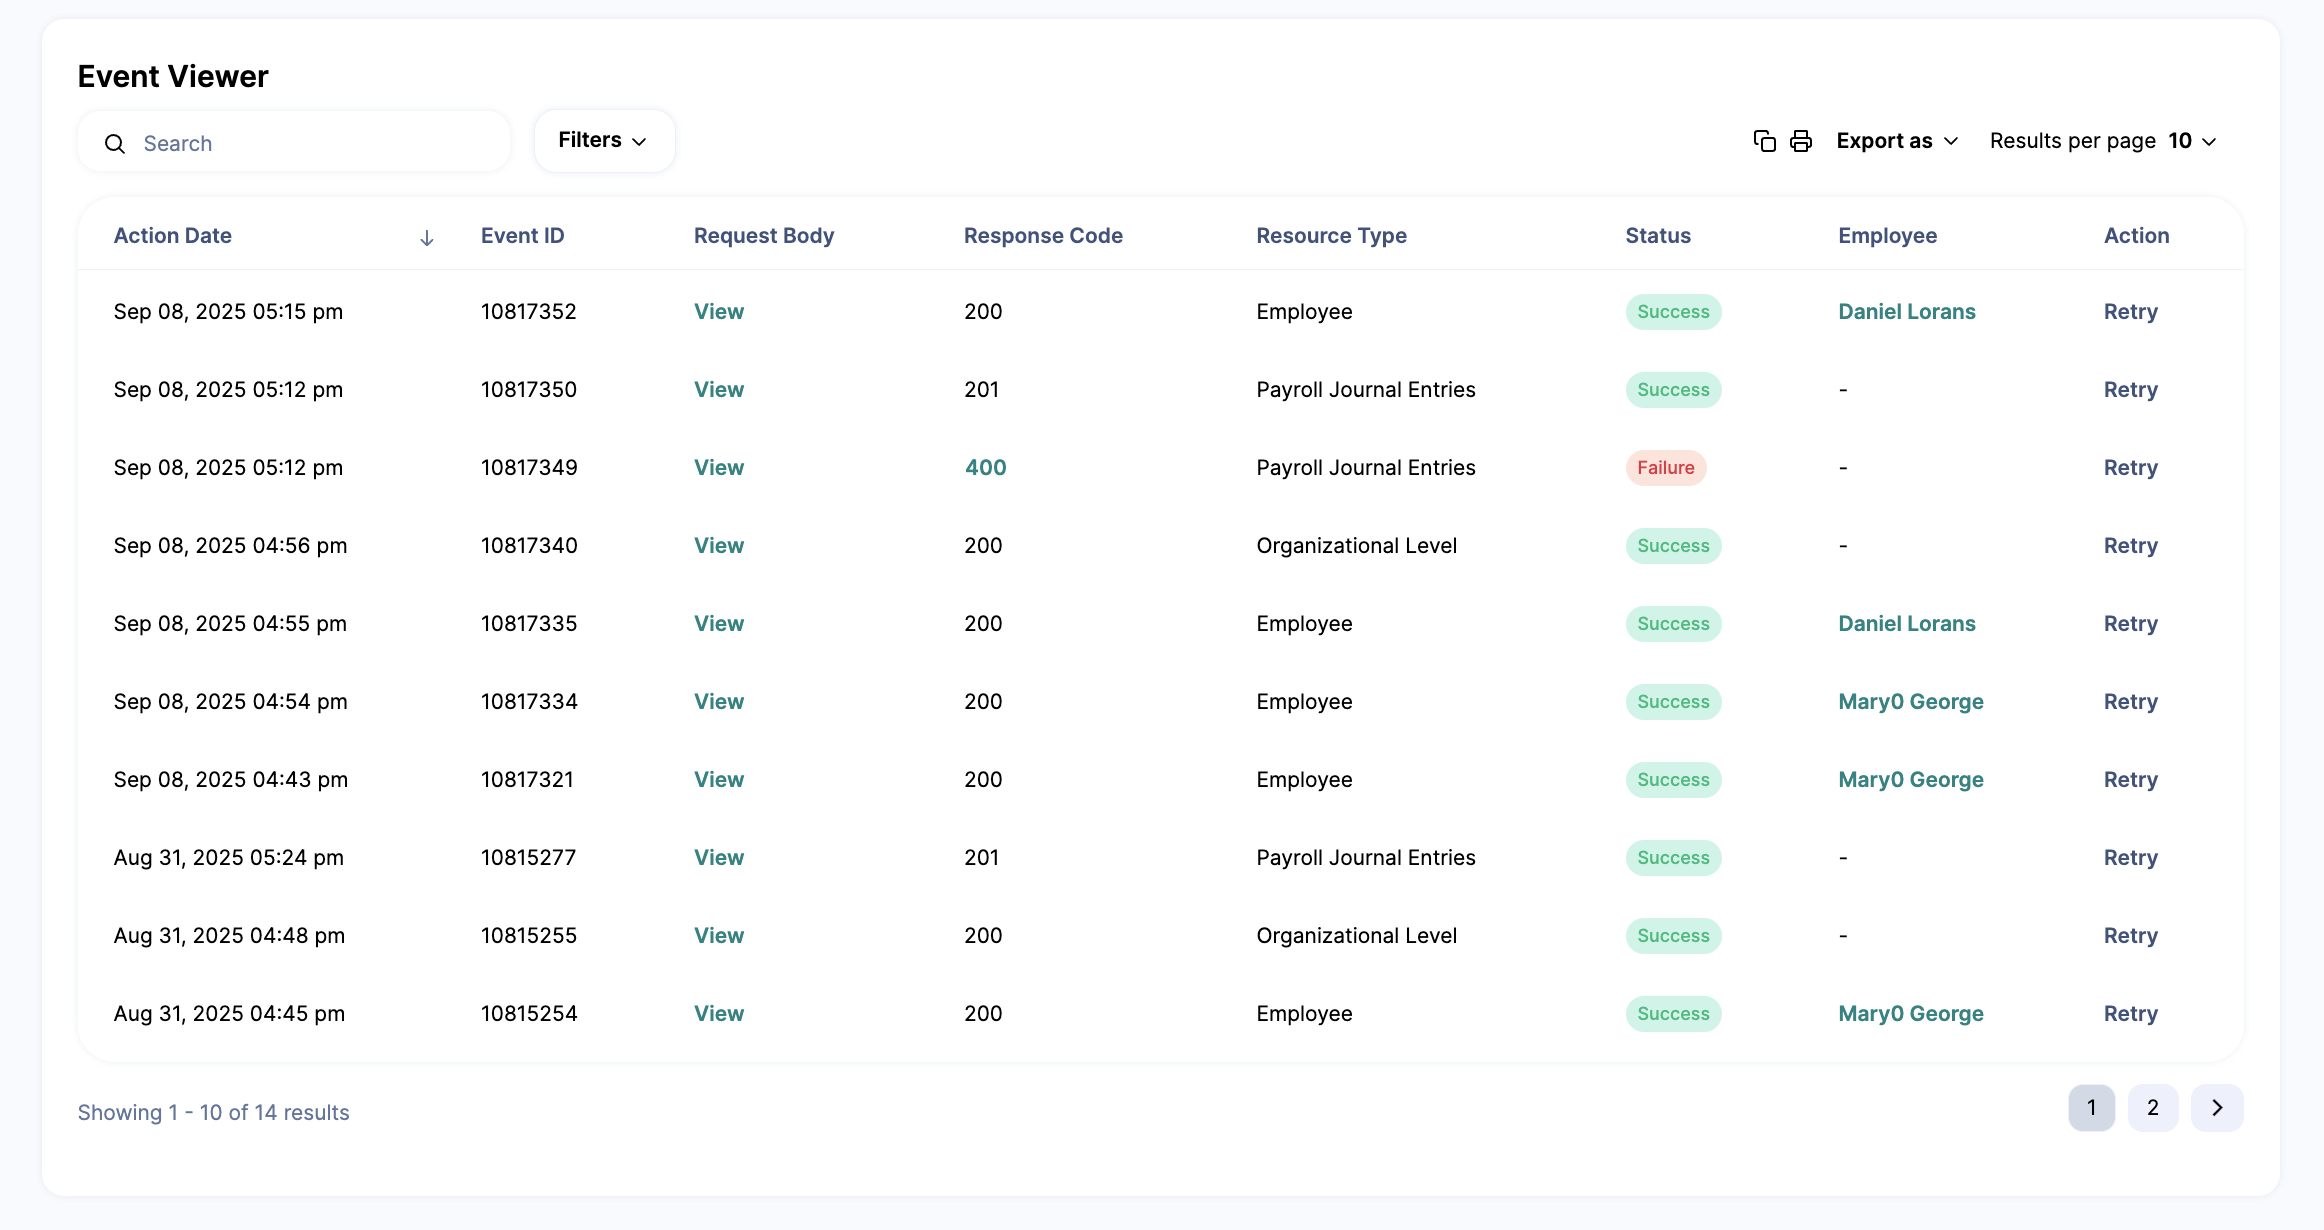
As with any integration, monitoring is essential to track events and activities between systems. ZenHR provides the NetSuite Events Viewer, which allows you to monitor all integration activities, view their statuses (such as successful, failed, or pending), and identify any errors that occur during data transfer.
This tool also enables you to retry failed events without manually resending data, ensuring smooth and reliable synchronization between ZenHR and NetSuite.
To access the NetSuite Event Viewer:
1. Navigate to User Menu → System Preferences → Integration Setup → Financial Integrations → NetSuite Setup.
2. Select Retry to resend any failed events and complete the synchronization process.
Note: You can also monitor event statuses in NetSuite by accessing the Execution Log of the related script.
Comments
0 comments
Please sign in to leave a comment.